Emacs org-mode
Welcome to the Emacs org-mode category.
You can subscribe to this category only via RSS!
I am working on restoring some of my related posts from my old blog, so keep checking here for new content.

-
Xah’s fly keys for the Glove80 (he only has a Dvorak layout for it) inspire me to make some modifications. For example, Xah has a shift key that acts as shift when held down, but as tab when tapped. This works well because the shift key is meant to function when you hold it, and the tab key is for tapping. ↩︎
-
To add a new abbrev, stand with the marker after the abbreviation, and then use: C-x a g for a global abbrev (which applies everywhere in Emacs), or C-x a i l for the specific major mode of the buffer you’re in (so, if you’re working in shell inside Emacs, it will add an abbrev there specifically.)
-
Once added, Emacs has a smart (and when you get it, helpful) way of remembering your lower-case/upper-case usage, depending on how you recorded the abbrev. Assume we’ve added “rnd” for “Research and Development”. This means:
- “rnd” automatically expands to Research and Development
- “Rnd” expands to Research and development (only the first word is capitalized!)
- “RND” expands to RESEARCH AND DEVELOPMENT
-
You can escape abbrevs with C-q after typing the abbrev. If “rnd” expands to “Research and Development” but you actually want to type “rnd” in the buffer, type rnd followed by C-q1.
-
If you want to add a prefix to an abbrev, for example, you want the end result to be “non-Research and Development”, type: non- and then M-’ (this will result in a hyphen showing, which is good) and then rnd to produce the abbrev.
-
Finally, don’t forget about
edit-abbrevswhich lets you edit your abbrev file directly. This is good when you want to add a bulk of abbreviations (I did this when I wanted to add usernames: I copy-pasted a bunch of those from Outlook one day during lunch). - a basic spelling checker (dictionary-based)
- core grammar rule engine
- A spelling checker
- Core rule Grammar engine
- n-gram data set (optional as local install for free)7
- LLM (Paid, online only)
-
As I’m writing this, I realize another simpler trick is Emacs’ undo. Simply use C-/ (or whatever you have it bound to) and it will cancel the expansion. ↩︎
-
Now that I use corfu, which also contains my abbrevs, typing “george” will bring up a menu allowing me to choose george from a drop down instead of specifically typing @george. ↩︎
-
The mathematical concept behind this is called Levenshtein distance, after Vladimir Levenshtein, who came up with this in 1965. The basic idea in spelling programs is to measure how many “jumps” are required to correct a mistyped word. For example, “helo” to “help” is one jump, as well as “helo” to “hello”; “helo” to “hallow” though substitutes e with a, inserts an l, and then inserts the letter w — 3 jumps. This means that pure Levenshtein spell checkers will rank the first two corrections higher on the list (modern spell checkers introduce a few more tweaks). Wikipedia gives us an interesting history lesson here: Unix got Ispell, which is based on SPELL, and GNU built upon that with Aspell, which is what we have in Emacs today. The front end in Emacs,
ispell.el, is named after the original program it once used. ↩︎ -
Brennan wrote a good post about this recently with plenty of links, which I’m stripping here because I want you to go read his whole thing, not just my footnote: “To ask someone to write properly is to assume there is a way to write proper. There isn’t. There is no universal, static version of English. Or any other language, for that matter. Every dialect of English, including regional accents and non-standard forms, follows complex, systematic grammatical rules.” ↩︎
-
While most popular LLMs today are generic and don’t rely on more traditional grammar tools, specific grammar products like Grammarly and Langtool do use specific traditional tools as well as an LLM on another layer, making the box of grammar checkers as a category even more vague. ↩︎
-
After realizing how often I forget to update Harper on Linux (I don’t get reminders as I do with other packages), I searched for a solution and discovered topgrade. It’s a Rust tool that probes your system, figures out which packages you use as well as your hardware, and offers you all the updates in one go: apt, flatpak, cargo, snap, and even updates for your boot, if you have a Linux machine from a brand that supports it, like System76. ↩︎
-
n-gram is a sequence of symbols, or in our case, words, where n is the number of words. So “a nice sunset” is a 3-gram sequence and “they are wearing hats” is a 4-gram one. Grammar checkers look at many of these sequences in a large body of text and evaluate whether what we type has errors. For example, if I write “they are wearing hat,” the checker will run this against several examples and will find that “they are wearing hats” (with an s at the end) is much more common than the first example, which means the first example is probably wrong and should be corrected to what is found in the text. As you can imagine, the checker needs to look at a lot of text to make good corrections, which is why that body of text is huge — hence the size of a few hefty gigabytes. LanguageTool explains n-grams and how they use them, which is helpful. If this sounds similar to LLMs and how they work, it’s because the connection exists: the basic idea of looking through a large body of text is the same, and in a way, LLMs today are built on a similar concept. However, LLMs take this a step further and compute what would make sense using weights and other settings in real time, while n-grams are essentially static lists of words the computer just compares against. There’s no “thinking” involved. It helped me to think about it this way: in terms of hardware, your hard drive reading speed is way more important for n-grams than your GPU. ↩︎
-
This is, by the way, one of the reasons I did not want to start using special modifier layers like Xah Fly Keys or god mode. These can work, but they introduce another level of learning, like another dialect of English or similar. I might get there, but first I want to learn to use the Glove80 properly. ↩︎
- It tries to connect to a local host.
- If it fails, it next connects to an online dictionary at www.dict.org,
- The Collaborative International Dictionary of English
- WordNet
- V.E.R.A. – Virtual Entity of Relevant Acronyms
- The Free Online Dictionary of Computing (it has an entry as an ASCII character)
- We write “wate” and we ask Emacs to complete the word by calling completion with ispell with M-C i. Because the only word that exists (in English anyway) that starts with “wate” is water, Emacs will complete it for us to “water” automatically.
- Now, while standing on the word “water,” we call completion again. Emacs informs us: complete, but not unique. In other words: the word water is real and complete (we have it spelled right) but there are other words that start with water.
- While still standing on “water”, we call complete yet again. Emacs goes “OK. So you know it’s a word that exists, and you also know there are other words that start with water, so if you’re calling complete again, you probably want to see the other words that start with water.”
-
This post from irreal is a good place to get a bit more understanding of how to use a local dictionary, a copy of the online one, and why. If you read it, you may find your way into Irreal’s older post and then this wonderful gem he found: You’re probably using the wrong dictionary. The way these posts are written, I feel it makes more sense to read them in the reverse order I presented here, inviting more exploration as you go — however, if you’re short on time or patience, I recommend you read at least that last one, especially if you enjoy writing. ↩︎
-
As I was learning this, this next question popped into my mind: can we then look for a definition in Wikipedia and the Urban Dictionary as well? The straight answer: yes (it’s Emacs, duh). The full answer: it’s complicated. We can’t integrate it into the results buffer from
dictionary-searchdirectly, but what I can do is have it inside a “wrapper” buffer that will contain the dict.org definition with the Wikipedia and Urban Dictionary below it. For now, I’m fine with just usingeww-search-wordswhich initiates a search with Duck Duck Go, which already pulls Wikipedia search results near the top (Wikipedia itself forces JavaScript usage, which blocks Eww) ↩︎ -
By the way, something fun I discovered while researching: we can call the macOS dictionary using
dict://(as a URL link), and we can build a function in Emacs for it if we want. Further — we could create something like this for offline situations only, but this is not needed at least in my case. Worth mentioning: there’s also the osx-dictionary package, which bridges Emacs and the built-in dictionary app on macOS. But why, when you have a different (and arguably better) version built in? ↩︎ -
hippie-expanddoesn’t really have a help file that lists all the functions, though I think I’ve listed most of those if not all above. Check out the package directly if you want to read more about the functions; they are described in comments at the top of the code. Online, it’s here, or you can navigate your way to the package inside Emacs with C-hkM-/, and then go from there to the package. ↩︎ -
Turns out you don’t have to do it this way: you can switch to the completion buffer, and then you can move around with arrows, including up and down, and select what you want with Enter like a normal human being. You could also add
(setq completion-auto-select t)to your init for this switch to happen automatically whenever you press C-M-i. ↩︎ -
As mentioned earlier, these packages and their functions go beyond what I’ll write in this post, but a few things are worth mentioning: company is much older then corfu, which came into existence after Emacs implemented completion-at-point functions; as a result, corfu is based on capf, and doesn’t come with anything “extra” out of the box besides a few option to display completion in a dynamic matter. Company, on the other hand, is a much bigger package that has a whole backend to it, complete with a lot of additional functions. I ended up installing and trying corfu, with Emacs’ native functions, and then installed cape (completion at point extensions) makes more functions available in a buffer than you’d usually have. What does that mean? Well, say you’re writing something in org-mode. the cap functions you have available do not include, for example, file names and paths, which you might want; these functions will be available to you when you are in a shell buffer (usually) — it’s Emacs being Emacs and trying to be useful. So with cape, you can ask for that function to be available in org-mode as well. ↩︎
-
This post is here, on the new blog, because I migrated it from the old. The date on it is accurate however, and it’s the first post I have saved in my old archive. The same is true about the New Mexico post. ↩︎
Glove80: One Month in
It’s been a month since I first plugged my Glove80 into Hedwig and started using it, so I thought it was time for a follow-up.
First things first: this keyboard is the most comfortable thing I’ve ever typed on, to the point that I cringe now when I place my fingers on a regular keyboard in the office. If I wasn’t a keyboard snob earlier with my Kinesis, I definitely am now.
It’s not just the ergonomics, which I will get to below. I didn’t realize how important the switches are. I thought I’d miss the clicky sound and feel of my old brown switches, and sometimes I do for a moment, but it’s only for a few seconds. A whole morning of typing in Emacs? Nah. The Cherry Blossom switches that come with this keyboard are a pleasure to work with. They’re not only silent, but also super easy to press. It’s like whispering to my keyboard instead of shouting at it.
The real reason I ended up with the Glove80 was my RSI, and I’m happy to say it’s gone. That’s probably why 90% of people buy a keyboard that looks “crazy” like this one in the first place. Having the two halves separate also makes my shoulders and arms feel better. The keyboard parts are very light, so rotating them a bit into a slight “V” to fit the natural angle of my arms and wrists is automatic as I move around a bit, especially when I stand at my desk. With the Kinesis, which is much heavier and bulkier, this was a whole thing, not to mention the cables that ended up tangling around my coffee cup in the morning. This is much better.
Another important factor is the keywells. My fingers fit into those as soon as I took the keyboard out of the box. I know the keywells aren’t specific to the Glove80, but it was the first time I experienced them, and it makes you wonder why they don’t exist on all keyboards. It also helps you find the right position instantly. The palm rests fit, the slight height differences in the wells tell your pinkies where they should go, the thumbs naturally extend to the thumb row… it all felt right the second I placed my hands on the Glove80, and a month later it’s jarring not to have this when I switch to another keyboard.
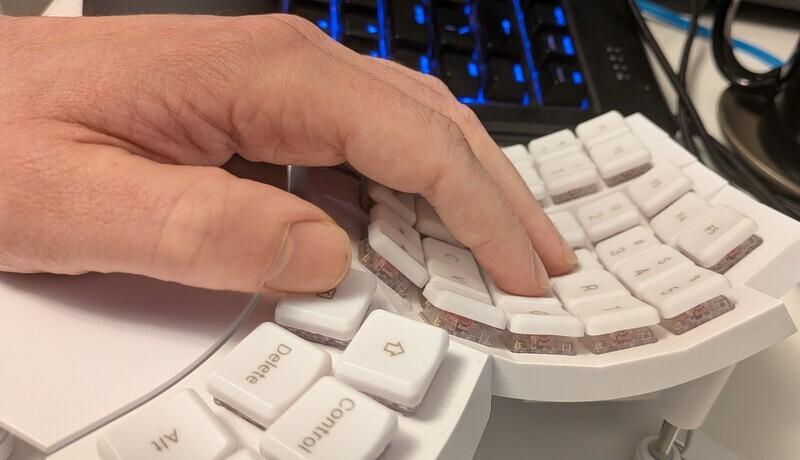
This brings me to the key positions and the columnar layout, which was (and still is, to an extent) the hardest part to get used to. For the most part, the regular keys for QWERTY typing work. The issue is more with the function keys in their factory settings and the conflict, in my case, with what Emacs wants me to use. I’m mostly used to the common shortcuts now, but my right hand still does most of the work with the left Ctrl, and I have to consciously force myself to use the right Ctrl key for keys on the left half (like x or s) and vice versa1.
The main issue I have with the keyboard now is gaming. This keyboard isn’t meant for WASD (see the layout in the picture below), which is hard-coded into any gamer’s DNA. For now, I switch back to the Kinesis when I play any action games. I could probably just create another layer for gaming, shifting the keys to maybe RDFG, but that’s just weird. Besides, games are more in the keyboard shouting category than the whispering one.
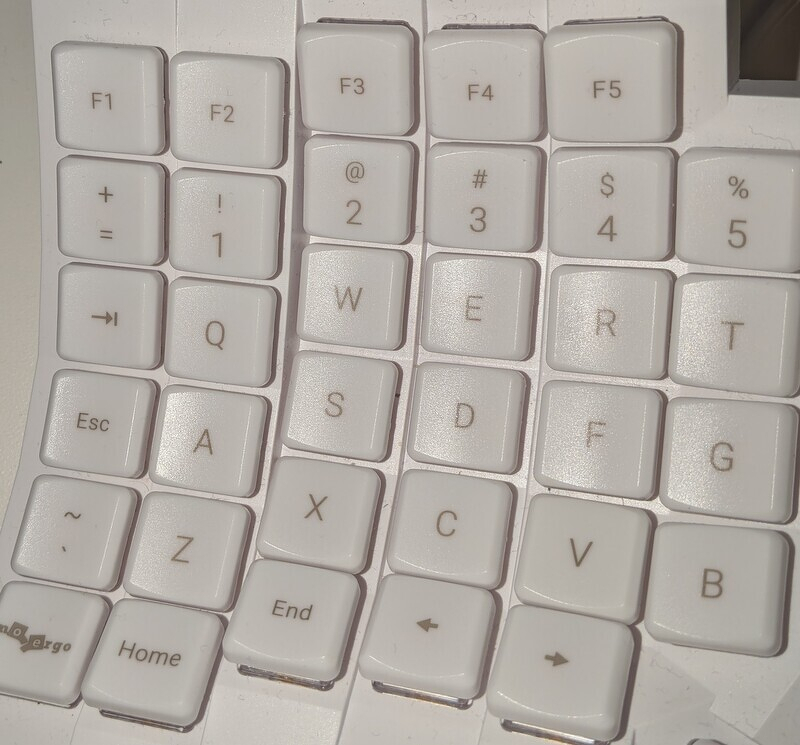
Other small annoyances… let’s see.
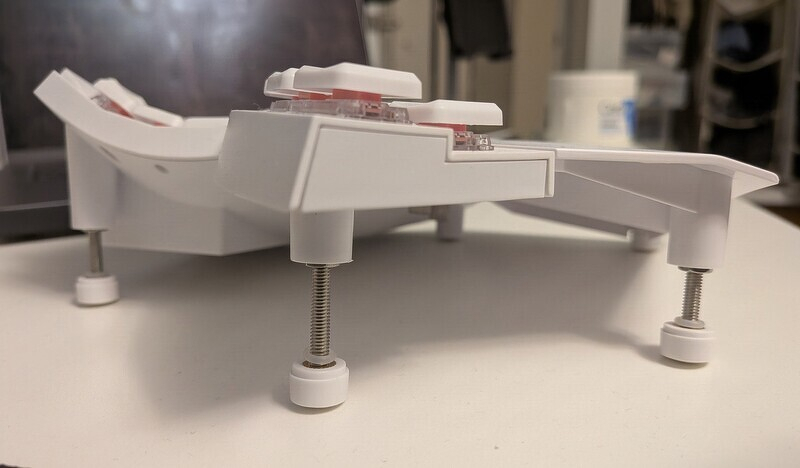
The legs of this keyboard. They are essentially screws with pads (the “boot” of the leg), and even though I use the nuts and rubber rings that came with the keyboard — which do help — the screws still move a bit from time to time, which results in the keyboard being a bit wobbly. It doesn’t happen often, and it takes a few seconds to fix, but I feel like there needs to be a better solution. I like to use a high tented angle with my Glove80, which means that when I want to use the case to take the keyboard somewhere, I have to unscrew the two long legs — the ones under the thumb rows — so they fit in the case, and then screw them back in and tighten them, which means I’m avoiding taking it with me, which is a shame. Here’s what these look like up close:
Two more nitpicky things: switching back to the Kinesis is actually confusing now, which I didn’t expect. I now type worse on the Kinesis than I used to. Not exactly bad, when you think about it: the whole point was to move away from standard keyboards, but the world still runs on the old standard. I now expect to find common function keys under my thumbs (where they should be!), but they aren’t, and that leads to typos at work because I don’t take the keyboard with me as I mentioned above. I’m fine on my laptop keyboard though; I guess it’s different enough from the Glove80 that my hands register it as a whole different mode and don’t get confused.
The other tiny small thing is not the keyboard’s fault at all: hard drive password at boot on Linux. There’s no Bluetooth at boot (it’s locked behind the encryption if you encrypt your hard drive), so I need to physically plug it in with the USB. This is a tiny little thing, but I find that passwords in general are frozen in my finger memory, and I have to watch myself type them now to get them right. The solution here is probably using new passwords that will work with this keyboard — which in turn means I will have the reverse problem when I can’t use this keyboard.
All in all though, this keyboard is fantastic. A few more months, and I’m sure I’ll incorporate more tricks to help with some of the issues I described above. I’m glad I got it. It didn’t just resolve my RSI issues, but it’s also making me a better typist in general.
Emacs Config Gems - Part 6
I came to realize that attempting to wrap up the “Wordcraft” section (as I call it) in Emacs is a fool’s errand. Emacs is Wordcraft. It’s what it’s all about. By the time I finish a draft, a new config or setting changes what I have. This here is an attempt to stay true to my conclusion in the last section.
Abbrevs
In my opinion, Abbrevs in Emacs is one of its fundamental features. It’s one of those things I’d show someone coming from other word-processing programs to show them the magic of Emacs. In essence, it’s a simple tool: you type two or more letters, and Emacs expands it to a phrase or even a whole paragraph. For example, when you type “hw” it will expand to “hello world” as soon as you hit space after the “w”.
Of course, you can achieve more with this useful function. We will get there. First, let’s discuss general usage:
Alright, with the basics out of the way, let’s dig into the config itself.
First, we want to turn on Emacs’ abbrevs. In my case, I want to put the abbrev file in a folder I sync between my computers so these shortcuts are available on both of them. To do this, I need to set the path for the abbrev file:
(setq-default abbrev-mode t)
(setq abbrev-file-name "~/Sync/Personal/.abbrev_defs")
Now something a bit more advanced. I posted about this before, but I didn’t explain my use case, and I think its usefulness is a bit lost as a result. Here’s the general idea.
At work, we have user IDs (usernames) that I need to use with ServiceNow, our ticketing system. It’s also useful when I want to write an email, and there are five people named “John.” My brain solved this problem years ago with nicknames: the John who has tattoos and a beard looks like a motorcyclist, so I call him Harley (Davidson); the other John loves tea from Georgia, so I call him George, etc.
When I want to dig out Harley’s username, I prefix it with @, and Emacs spits out “jd1234” for his username. This way I don’t hijack the word “Harley” to always be associated with jd1234, only when I really want to use it2.
The post I linked above explains how this works and gives proper credit to Prot, who helped me build this up using regex:
(abbrev-table-put global-abbrev-table :regexp "\\(?:^\\|[\t\s]+\\)\\(?1:[@].*\\|.*\\)")
(abbrev-table-put org-mode-abbrev-table :regexp "\\(?:^\\|[\t\s]+\\)\\(?1:[@].*\\|.*\\)")
Grammar Checkers
When it comes to grammar, I explored two options in Emacs. I first started with LanguageTool, then discovered Harper, which I use today. But as these Emacs posts go, I need to take a step back and talk about spelling and grammar checkers first.
With a spell-checking tool, we just need a dictionary: a list of words the program checks against what we typed and identifies the closest match in its list. The mechanism behind it is a mathematical principle of edit distance: it is a fuzzy search for words that are the closest to the misspelled one3. This can be complemented with a personal dictionary of additional unofficial words that we tend to use, and that’s mostly it; we’re good to go.
A grammar checker is a different animal, or actually, animals. And before we start talking about these, it’s worth mentioning that grammar, or what is generally considered “correct” language, is a moving target4. Language is a grey area, where what’s correct can be — at least to a degree — subjective.
The complex mix of tools used in what we cram together today under the term “grammar checkers” is a big underestimation of the history and development of the last 50 years or so of progress and the different tools that we use today. With modern-day LLMs, the confusion extends further, as these usually don’t use any of those tools, relying only on transformers and weights to predict what seems correct and what isn’t5.
Harper
Many Emacs folks, myself included, use Harper these days. It’s no wonder, given its speed and minimal install size, especially compared with LanguageTool, the other free alternative. But this lightness comes at a cost.
Harper provides:
… and that’s it. Indeed, in my first post about Harper, I noted a couple of basic errors it missed, and I still think it’s far from “the private alternative to Grammarly,” as it states on its homepage. I actually barely use it because it’s the competition that does a much better job, grammar-wise. If it were up to me, the tagline would be “a private, fast, customizable grammar checker for when you don’t want a grammar nanny looking over your shoulder.”
Harper is available on homebrew (it seems the folks behind Harper made a dedicated dmg since I last installed it), but for Ubuntu and its kin, it requires Cargo. This also means that if Harper is the only program you have from Cargo, you also need to remember to update it6. I’ve written and explained my Harper setup a few times, but it evolved over time to accommodate both my Mac and my Linux desktop, so I’m including the whole thing here. Note that Harper works through Eglot on Emacs, as I explained in the first post linked above.
(with-eval-after-load 'eglot
  (add-to-list 'eglot-server-programs
               '(org-mode . ("harper-ls" "--stdio")))) ; This is the eglot-related integration
(setq-default eglot-workspace-configuration
           '(:harper-ls (:dialect "American" :linters (:LongSentences :json-false :AvoidCurses :json-false))))
;; These are options for Harper. I chose American dialect as the language, I also want to ignore long sentence errors (the main issue is that it hides other errors nested in those) and I also want Harper not to tell me when it thinks something is offensive. The full list of these options is in https://writewithharper.com/docs/rules. It needs to be nested inside the :linters option.
(when (eq system-type 'gnu/linux)
  (add-to-list 'exec-path (expand-file-name "~/.cargo/bin"))
 (add-to-list 'exec-path "/snap/bin"))
;; On Linux, harper-ls lives in ~/.cargo/bin (installed via Cargo/Rust).
;; /snap/bin is added for Vale (installed via snap - that's another program I might discuss, ignore it for now) and any future snap packages.
;; On Mac, Harper is installed via Homebrew which handles PATH automatically.
LanguageTool
LanguageTool provides:
In addition, as I was researching more into LanguageTool, I found lesser-known layers and additions that are not fully documented. For example, there’s a neural network for confusing pairs included. I don’t know how important those other tools are, but if you use the full product online to get a taste, you will see the difference when comparing it to Harper immediately.
While it sounds like I’m favoring LanguageTool over Harper, I don’t have it installed anymore, and I haven’t used it in a while. The reason for this is that it requires Java and over 10GB (yep) if you want to get the n-gram running with the other additions. Below is my old config, based on version 6.1. You will need to install langtool.el to run it, without the full layers discussed above (by the time I found out about these options, I stopped using it):
(require 'langtool)
(setq langtool-language-tool-server-jar "~/Path/To/Current/LanguageTool-#.#/languagetool-server.jar")
(setq langtool-default-language "en-US")
All in all, I do not think Emacs is the best place for grammar checkers. YMMV, but since I have access to Grammarly Pro’s features, I prefer it. I also use AI to go through my posts, and it does a few very useful things, grammar being just one of them if I need it to. If I didn’t have Grammarly, I’d consider LanguageTool’s pro package, which comes with additional perks that are not available for a local install.
My logic here is simple: if I write a post for my blog, which is going to be public anyway, I don’t mind using online tools or LLMs. For more sensitive things, like my journal, I use Harper if I want to, but most of the time it’s an overkill for my own mind’s rambling anyway. This is why I said above that I barely use Harper, as I don’t really have a use case for it.
Glove80 and Emacs: Re-training my Fingers
I’m still getting used to the Glove80. Writing text is doable but still painfully slow.
I mentioned I use tangent, which integrates the Glove80 layout. One thing it doesn’t have though is a practice layer for Emacs, with Emacs key chords like C-c C-z, for example.
So I called Claude for help.
I’m on the third version of this mod, adding the command names from Emacs, so that I know what the commands I’m retraining my fingers on are — because my fingers remembered these commands (and thus are now clueless), and now I need to commit them to memory again through my eyes. This here is the first post written fully with the Glove80. I’m getting there.
Glove80: First Impressions — the typing reset
I said I’ll do it, and I did. I got my Glove80 early! I looked at my emails yesterday afternoon, and there they were, waiting for me in the mailbox.
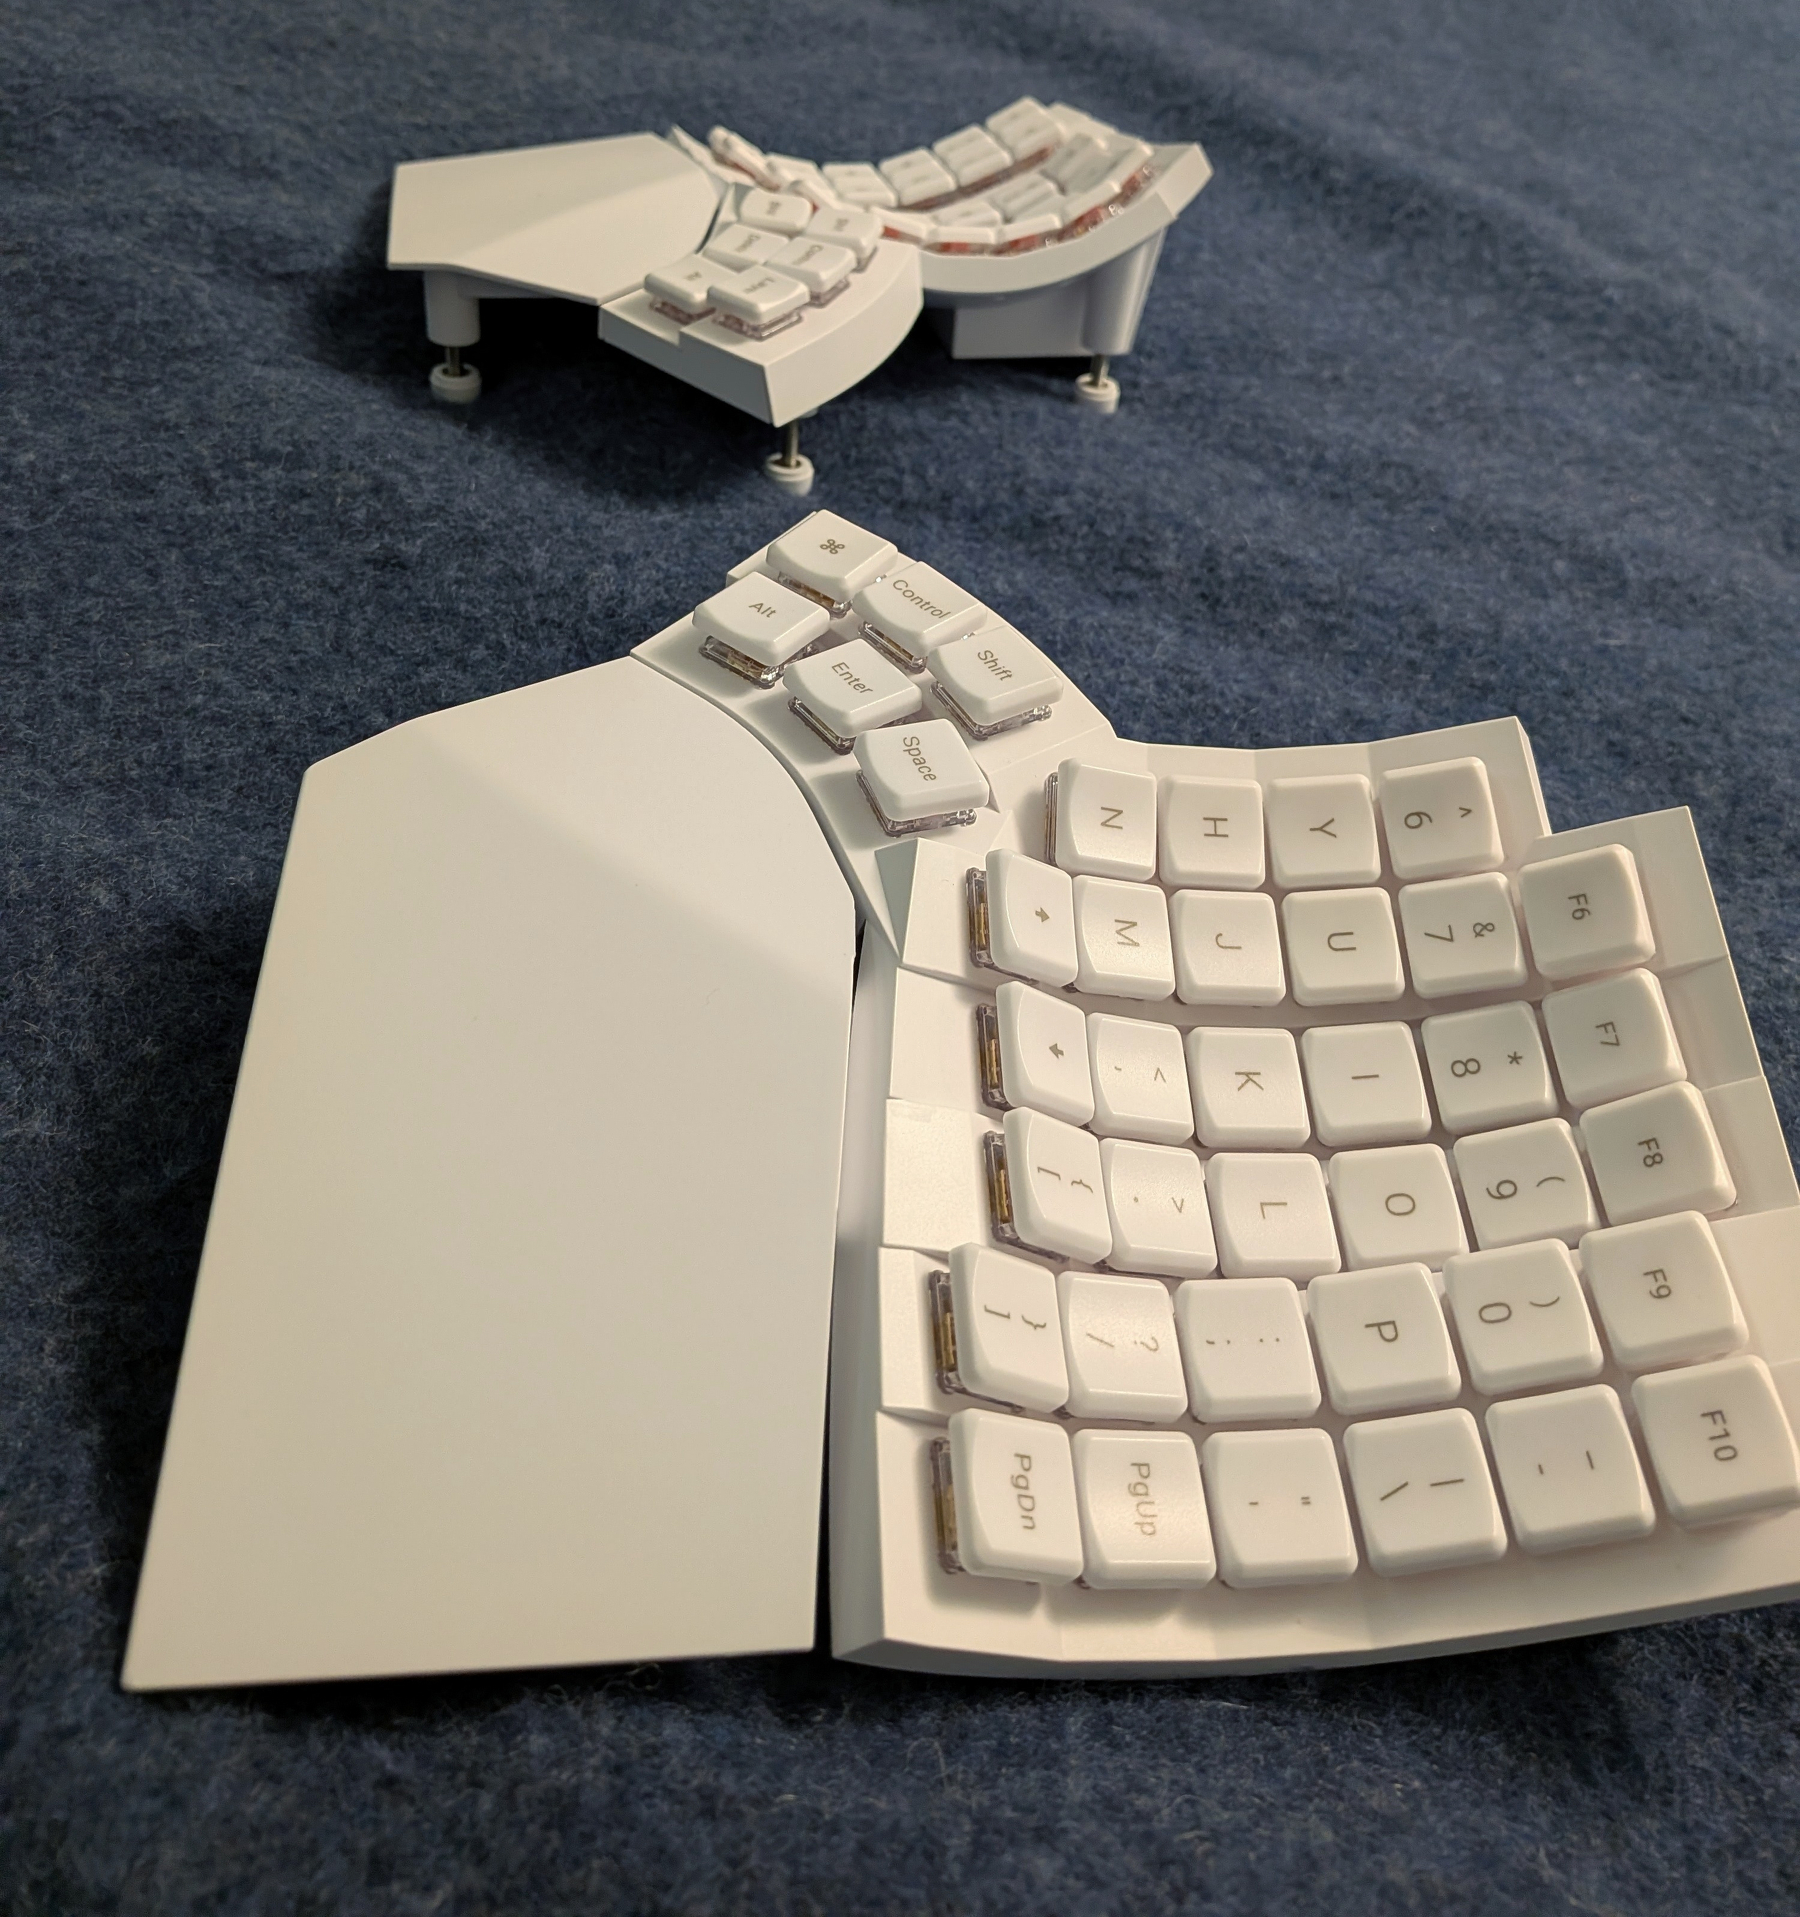
I was surprised at how light the box felt, even though Xah mentioned it several times in his review. I knew it was made of plastic, but this light? Yep. The other thing that surprised me was the size: they are smaller than I thought, which in my case is excellent (I have small hands).
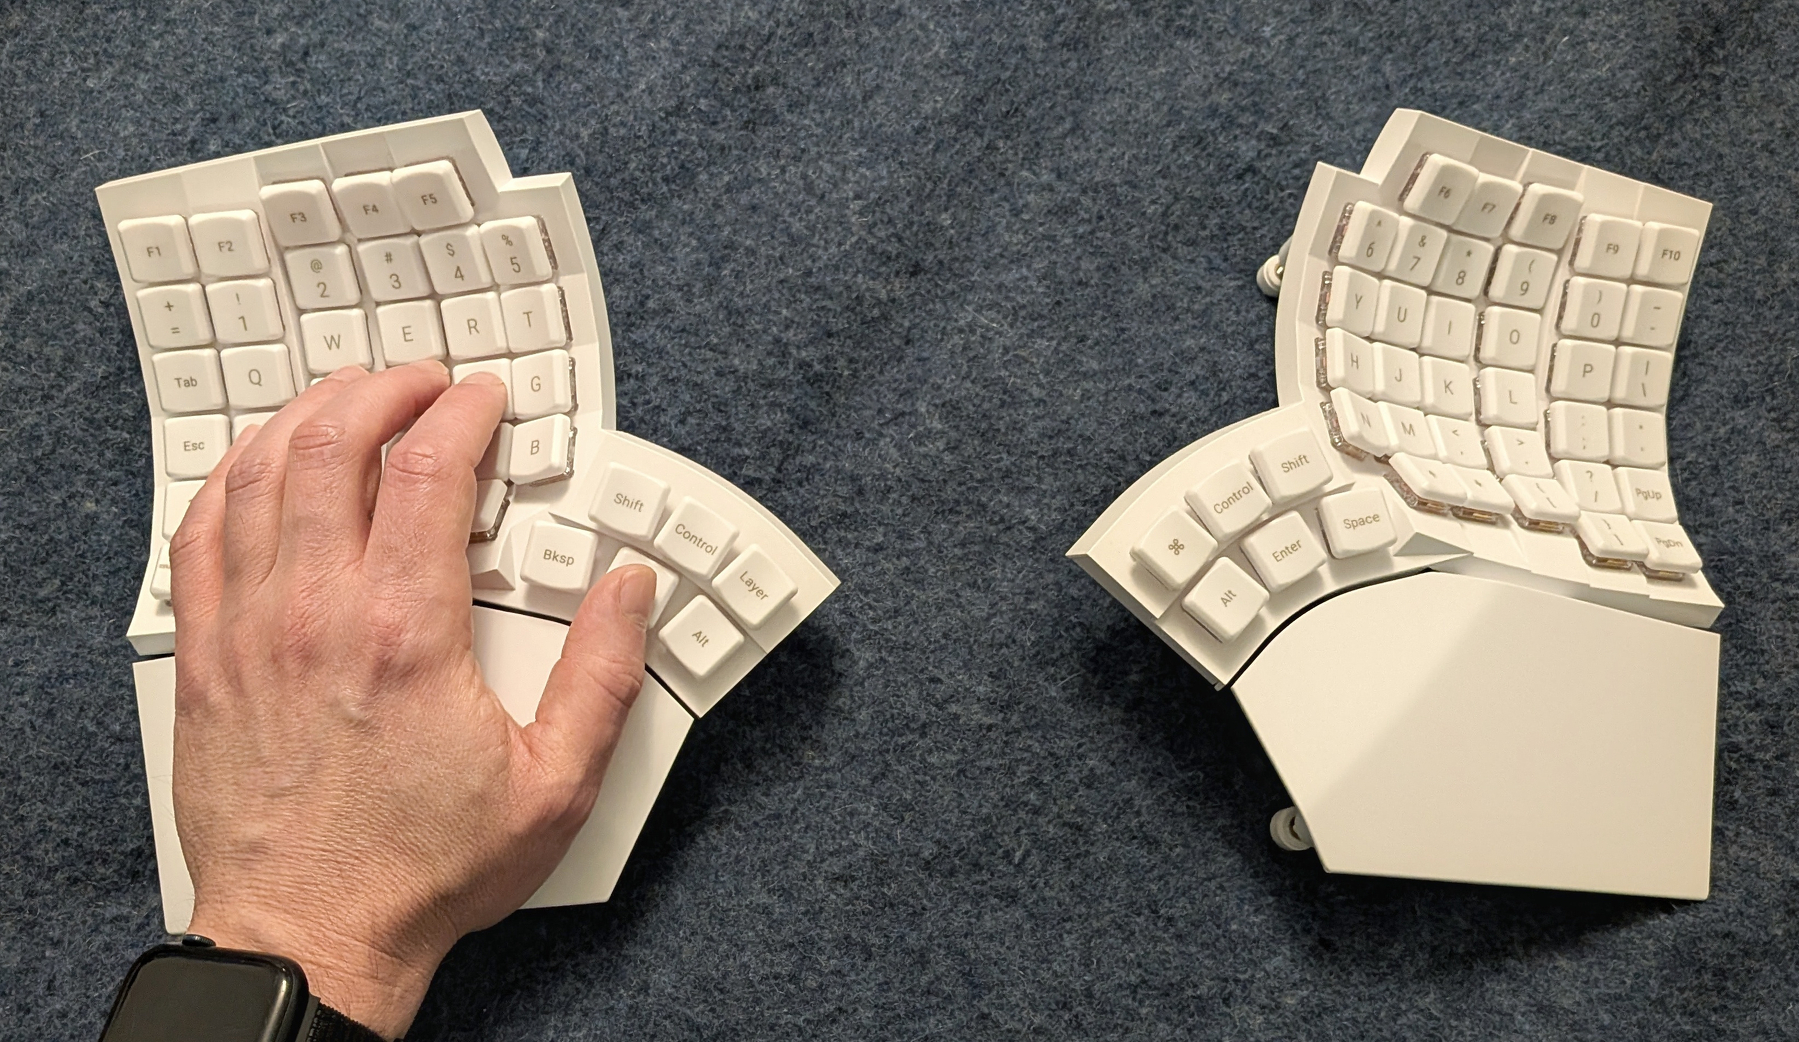
I still need to pair it (or them? as in both parts? the gloves?) with Bluetooth to both my Mac and my Linux desktop, since I only used them connected (to charge them). There is a lot to like about this keyboard, but first the big caveat: getting used to it. Them. The thing. Ugh, take your pick.
Thankfully, this was not a surprise. It’s the big issue with this keyboard: it smashes your finger memory to bits and you need to start from zero again. I couldn’t get a single sentence through my journal yesterday, and I’m typing this post here with my old Kinesis keyboard because I want to put it up today — but I’m working on it with tangent, which is designed for the Glove80 and even has an option to choose which layout I use, as it has several (I chose to stick with the default one, even though they have a macOS-dedicated one with two command keys).
I estimate it will take me about a week to 10 days of learning before I can start typing normally with it, and then another week or so to build speed and maybe add additional customizations. But that’s the main idea here: this keyboard feels right.
Even if ergonomics is not something you care about, having a keyboard that you can customize with buttons that work for your needs (and let’s be honest: Emacs, Linux and macOS come with their own unique needs when it comes to keyboards) can probably turn you into a better typist. Xah might sound a bit like a keyboard preacher, but one of the points I definitely got from him is that standard keyboards are designed after old typewriters (including the brick-like pattern of the keys), which does not make sense on modern computers. If I could go back to when I started learning to type on a computer, I would have taught myself to use columnar keyboards the same way we learn a second language.
It’s the same principle: your fingers won’t forget the old layout as long as you use it. I’m typing this on my Kinesis, and I’m fine. Meanwhile, this Kinesis keyboard is split wide apart (I have a mouse with a mouse pad separating both halves) in such a way that typing on a regular full-size keyboard (which is one board) does introduce typos I do not have on my MacBook’s keyboard, because I still use it enough. So take this to heart — I think this second language example I use is pretty spot on1.
Besides the customized buttons (which can be done with many keyboards today), I like how it’s built and shaped. It makes sense when you look at it: the keyboard should fit your hands, not your hands fit the keyboard. And while the lightness and the plastic might not be everyone’s cup of tea, I do find that I like it.
The keyboard is very easy to pack in the included case and carry with you: It practically weighs nothing, and there are no wires to stuff in the case (it’s meant to be completely wireless). It’s easy to clean, and the palm rests (not the wrist rests, which is another thing, which might introduce a problem of its own) can be wiped off easily. The keycaps come off easily if you want to replace them with others, and I’m learning to appreciate the soft, quiet keys. I might miss the heavier, clicky switches on the Kinesis, but I ask myself whether that’s more nostalgia than a real need. After all, if this keyboard were loud and clicky, I’d think twice about bringing it to the office and annoying everyone around me. But hey, to each their own.
There’s a lot to like here, but I’m definitely still in the honeymoon phase. Give me a week, and I’ll probably write more about the issues I’ve encountered and why this keyboard might not be for everyone.
RSI/Pinky Update
I wanted to write a short update to my Emacs pinky / RSI situation.
I am still using my Kinesis Freestyle Edge keyboard. I think I’ve decided on the Glove80 as a replacement, but the price and the inability to easily return it are giving me second thoughts. Its style is very different, and I know I will have a hard time adjusting. Still as someone pointed out to me it’s not like I’m forced to throw away my current keyboard, which is true. I see myself using my Kinesis for work on the Mac while trying the new Glove80 on Linux for blog posts and more leisure-time typing.
I’ve made a few adjustments, however:
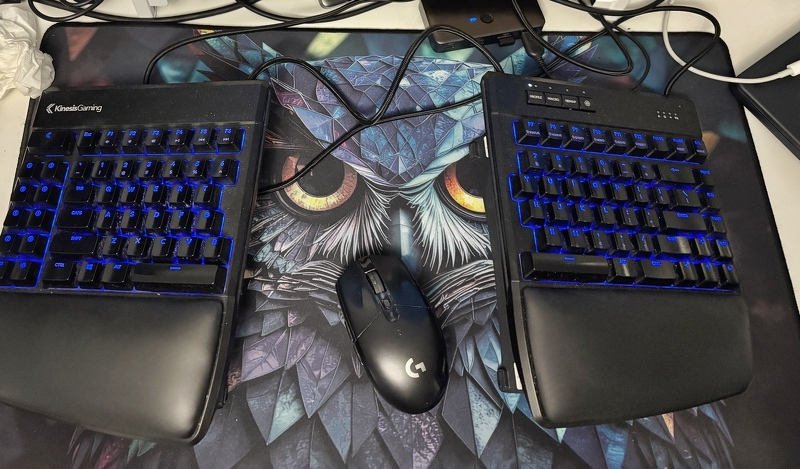
First, the spread between the two halves is much wider. This is something I was considering when I first got this keyboard, but I didn’t follow through with it. I got used to the wider split within a couple of days. It does make my shoulders feel better and more natural, especially when I’m standing at my desk. With that, I also started using the keyboard’s full tenting capability at all times: I used to have the keyboard flatter when sitting down.
The mouse is in the middle, and since I use it for quick bursts between otherwise typing sessions, it’s fine. When I game, I move it back to the right. I can basically ignore the entire right half of my keyboard while gaming, since most of the action happens on the left.
Gone is the Caps Lock as Ctrl. Caps is just Caps again. I’m still pressing it now and then out of habit, but for the most part, I switched back to using the original Control keys. I try to force myself to use my thumb, which means I have to curve my thumb into my left palm if I use the left side, or I just go all the way to the right and use my Ctrl key there. This is the most difficult part because it’s not just muscle memory: the Ctrl key is out of the way, and it can slow me down.
I also realized that the Windows key, which also acts as the Command key on my Mac, should be way more prominent than this keyboard allows. Thanks to PopClip on the Mac, I don’t use it much for copy-pasting on macOS (and since you have to use your mouse anyway to highlight text in Emacs, having PopClip is just a natural extension that I’m happy to have).
Speaking of the mouse, I know some of you will wrinkle your nose in disgust — but I started using it more in Emacs. Sometimes when I want to select text further down or up from where I am with the mark, it’s just easier to grab it and highlight the text this way instead of using the keyboard. I am also in the process of rediscovering the menus in Emacs (yes, those menus that all of you Emacs gurus love to hide), especially when it comes to reminding myself of useful shortcuts I keep forgetting — like registers, the mark ring, and other org-mode tricks I keep forgetting about.
My pinky still annoys me, but less. I seem to have this habit now of letting it hover over the keyboard instead of resting on the shift key. It’s almost as if I lost my ability to place my left hand correctly and naturally at times. It’s one of the things I hope the Glove80 might help with.
Emacs Config Gems - Part 5
Being a text editor (among other things), Emacs has quite a few tricks up its sleeve for making writing not just easier but also fun and seemingly magical. I call this section in my config “Wordcraft.”
Emacs Dictionary
When we need a dictionary, Emacs got us covered and then some. After version 28, Emacs connects to a dictionary as a two-step process by default:
This workflow remains in place as long as dictionary-server is nil, which is the default. It’s a bit confusing (to me anyway), since “nil” might indicate that no dictionary is set up, but here it means we simply didn’t introduce any configuration to it.
The online version at dict.org contains the Webster dictionary from 19131, which (if you follow the footnote) will start sounding like an excellent resource. What I didn’t know up until now however is that dict.org contains more than just this wonderful dictionary.
When you search for something like “US” with Emacs’ built-in dictionary, it checks this database and gives you results from:
There are others, like the CIA Factbook and the Bible, among others. All of those are at your fingertips, inside Emacs, from a simple quick search2.
The problem is that it’s an online dictionary. No internet, no dictionary. On my MacBook this can happen as I take it with me when I travel. Meanwhile, on Linux, I’m always online (desktop, wired connection).
Follow the footnote, and you will learn how to get that Webster dictionary (but just that, not the database at dict.org) working offline. As for me, I don’t want to set up an offline dictionary because macOS’s dictionary app3 (which works fine offline) is good enough — a quick copy-paste and I’m done. So I configured my dictionary-server to point directly to dict.org, so Emacs doesn’t even search for a local one first.
Here is the setting itself, including the localhost option as a reference and a reminder:
;; (set dictionary-server nil) default, search localhost and then dict.org
;; (setq dictionary-server "localhost") local only, no online search
  (setq dictionary-server "dict.org")
Hippie Expand
I learned about hippie-expand through Mastering Emacs. It’s one of those things that make Emacs magic. It uses different expansion functions (not to be confused with completion functions, which we will learn more about in a minute) to guess which word should come next in our text as we write, depending on which buffer we are in.
Following Mickey’s advice (linked above), I rebound this to M-/, which is bound to dabbrev-expand by default. It’s similar, but not as powerful (essentially it’s more basic; hippie-expand takes the functions that dabbrev-expand uses and builds on top of those with additional ones). Keep pressing M-/ to flip through suggestions.
The catch is that you need to open the buffers you want it to look through. For example, if I want it to pull words from my personal journal while writing this post, I need to have my journal buffer open somewhere. If you’re one of the people who don’t turn off Emacs often, this is not a problem — just keep that in mind when you use it.
Turning it on (by replacing the command, using the same binding):
(global-set-key [remap dabbrev-expand] 'hippie-expand)
We also want to change the order in which it searches for things so it works better for us. For me, as a person who does less coding and more writing, I prefer it to look at Lisp-related functions toward the end. The same logic applies to global (all-buffers) lists vs those that operate on the visible buffer only. So our first M-/ will give us suggestions from our current buffer, and as we keep pressing M-/ and exhaust those, it will search all the other buffers we have open. for other suggestions4.
(setq hippie-expand-try-functions-list
      '(try-expand-dabbrev
        try-expand-dabbrev-all-buffers
        try-expand-dabbrev-from-kill
        try-expand-line
        try-expand-line-all-buffers
        try-expand-list
        try-expand-list-all-buffers
        try-complete-file-name-partially
        try-complete-file-name
        try-expand-all-abbrevs
        try-complete-lisp-symbol-partially
        try-complete-lisp-symbol))
ispell
ispell is one of those things I set around the time I started using Emacs and never looked at again. I’ve made a mistake: I bound ispell-region to M-$. Those of you who use ispell often are probably perking an eyebrow: “huh? Why would you do that for? ispell does it by default!”
But somehow I didn’t know this. For years I highlighted whatever I needed to spell check, even single words. The default keybinding attributes M-$ to ispell-word, which checks the word at the marker, but if you have a region selected, it spellchecks the region. I should have given Emacs more credit; today I know better.
Another really handy thing I did not know about ispell is its ability to complete words I’m unsure of. But before we go on, please note that word completion (and completion functions) in Emacs is a big topic that I just spent a whole week on, and what I’m going to discuss here is just the tip of the iceberg.
First, the useful built-in completion built into ispell itself: l for lookup. Say you forgot how to write “psychiatry”. You type what you know — “psy” — and then call ispell, and as the suggestions show up, press l. ispell will ask you what to complete, along with a wildcard, so add * and then y so you have “psy*y”. ispell will show you what words start with psy and have whatever letters after but end with y. Useful!
Another thing I didn’t know: use R for query replace. This is good when you make the same mistake across several words. For example, when I wrote this post, I originally capitalized every ispell as Ispell. No problem. Stand on one of those, call ispell, press R to replace, and change it to ispell. Now you are prompted if you want to change all of them one by one, or, just hit ! and get it over with in one swoop.
With those quick tips, now back to completion functions.
Years ago, when I started using Emacs, I installed company with its minimal default settings and called it a day. It’s been working OK, and up until I started writing this post, I didn’t realize how much about Emacs completion-at-point functions (capf). Prot has a good video about this, which I’m still chewing through, but basically for ispell the magic happens when you stand on a word you don’t know how to finish and ask Emacs to suggest completions.
To understand how this works, Let’s say we don’t know if water is written as watter or watar, as a simple example.
Bam, we have a buffer full of words that start with water, like waterboard or watermelon. We can select a word from this menu, even though it’s a bit weird — by going down or up with M-⇡ and M-⇣, then insert the word we want with M-Ret5.
This is nice, but usually you want to complete words that you already know, or kind of know. If I type “psych,” I don’t need a whole buffer of words if I’m looking for “psychology”; I just slowly add letters until I find what I need — and this is exactly what packages like company or corfu6 do.
Harper, languagetool and abbrevs
Let me just remind you of those for now and finish up this post. We will dig into those more next time.
This is now fixed: GCC drive error on macOS: This seems to show up with almost every new Emacs package I’ve been trying recently on my Mac. I remember trying to dig into it, and I went in circles trying to install something from Homebrew. Has anyone fixed this? I’m on GNU Emacs plus 30.2.
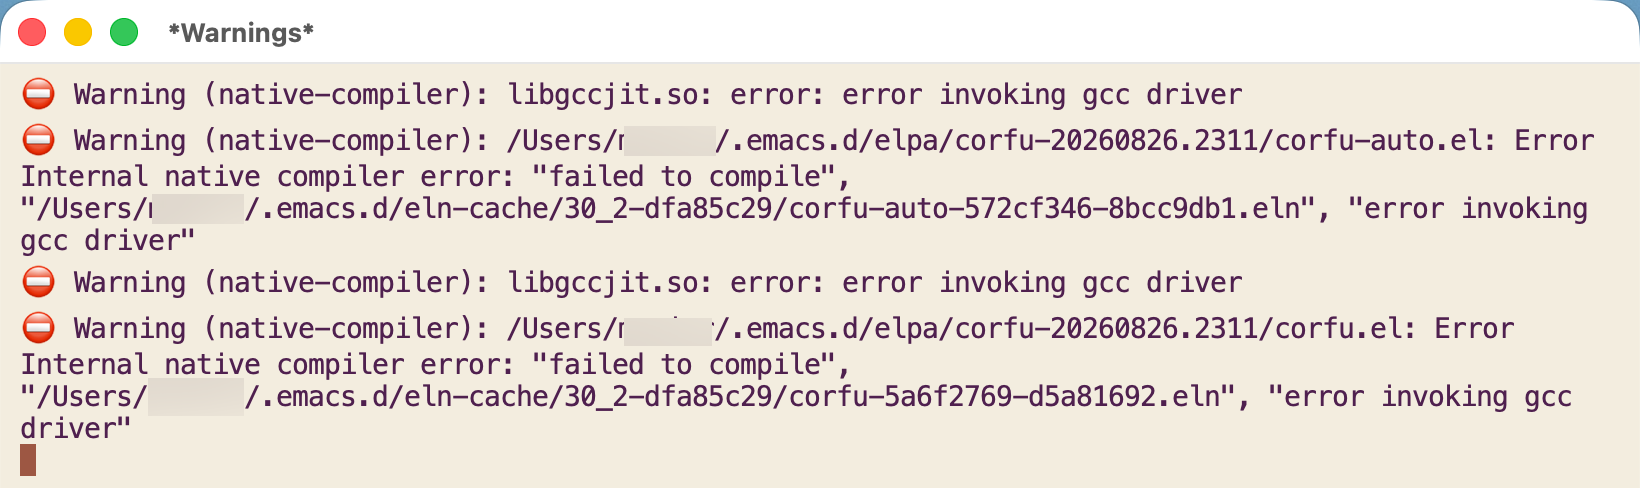
A quick update for my Emacs config Gems series:
I am working on part 5, and I’m trying to finalize a few things first. Currently it’s Ispell (I’ve not been using it to its full capacity) and completion… more details soon.
RSI and Emacs: When Your Pinky Says Enough is Enough
I’ve been doing so much Emacs writing lately, so I guess it’s time I get my Emacs pinky (which is a form of RSI). I made a quick reference to it three days ago and got a lot of responses.
What happened?
I started to feel a strain last week, but at first I didn’t think much about it. Sometimes my pinky rests awkwardly on the keyboard because I’m used to using the Caps Lock key, but it’s usually a hand-position issue. After I readjust and let my pinky rest, it goes away.
This time the strain didn’t go away, and my pinky kept rebelling.
My keyboard, Kinesis Freestyle Edge (the one here is the RGB+, the original RGB is discontinued), has a prominent Caps Lock key that just screams “use me as control!” For years, that’s what I did. As you can see in the picture, with my pinky resting on it.
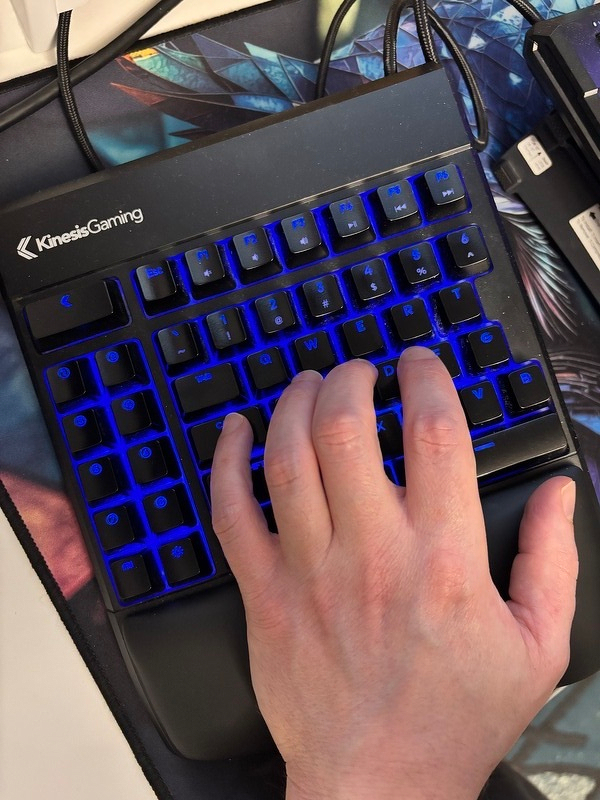
The last week has been busy. I didn’t leave my small Manhattan apartment for two days, working straight from morning to evening, then gaming and sleeping. This isn’t normal for me and has taken a toll on my hands, and the RSI got worse.
I think my new screen also exacerbated the problem somehow. It’s much bigger and has higher resolution, which I’m still adjusting to by how I sit and how I move my head and neck. I also have a standing desk I usually use in its standing position in the morning, when I write these posts or work on projects — these are easily my longest writing sessions, sometimes going for two hours straight without a break, especially in the last couple of weeks, and that’s all Emacs and pinky work.
When I thought about Emacs pinky in the past, I mostly thought of it with a smirk. I mean, it’s your pinky. How can you not read a comment about someone having their little finger hurt and not chuckle a bit? But folks, let me tell you, once you have it, you realize how much you depend on that one small finger, especially as an Emacs user.
My work, my organization, even my gaming in the evening (as it turns out), it’s all going through that little finger. Sure, it’s my “fault” for using Emacs, but if you’ve been reading this blog for a while you’d know that I owe many things to Emacs (including, among other things, my current job).
What am I doing about it?
For now, I’ve started using the keyboard’s dedicated control key again and changed how I use my hands. I try to use my right thumb, all the way to the side from the home row (my keyboard is huge, I will get to that in a minute) for when I need to use the left side of the keyboard, and then fold my pinky and use my knuckle to press it when I need the left control, for when I use the right side of the keyboard, as you can see in this picture:
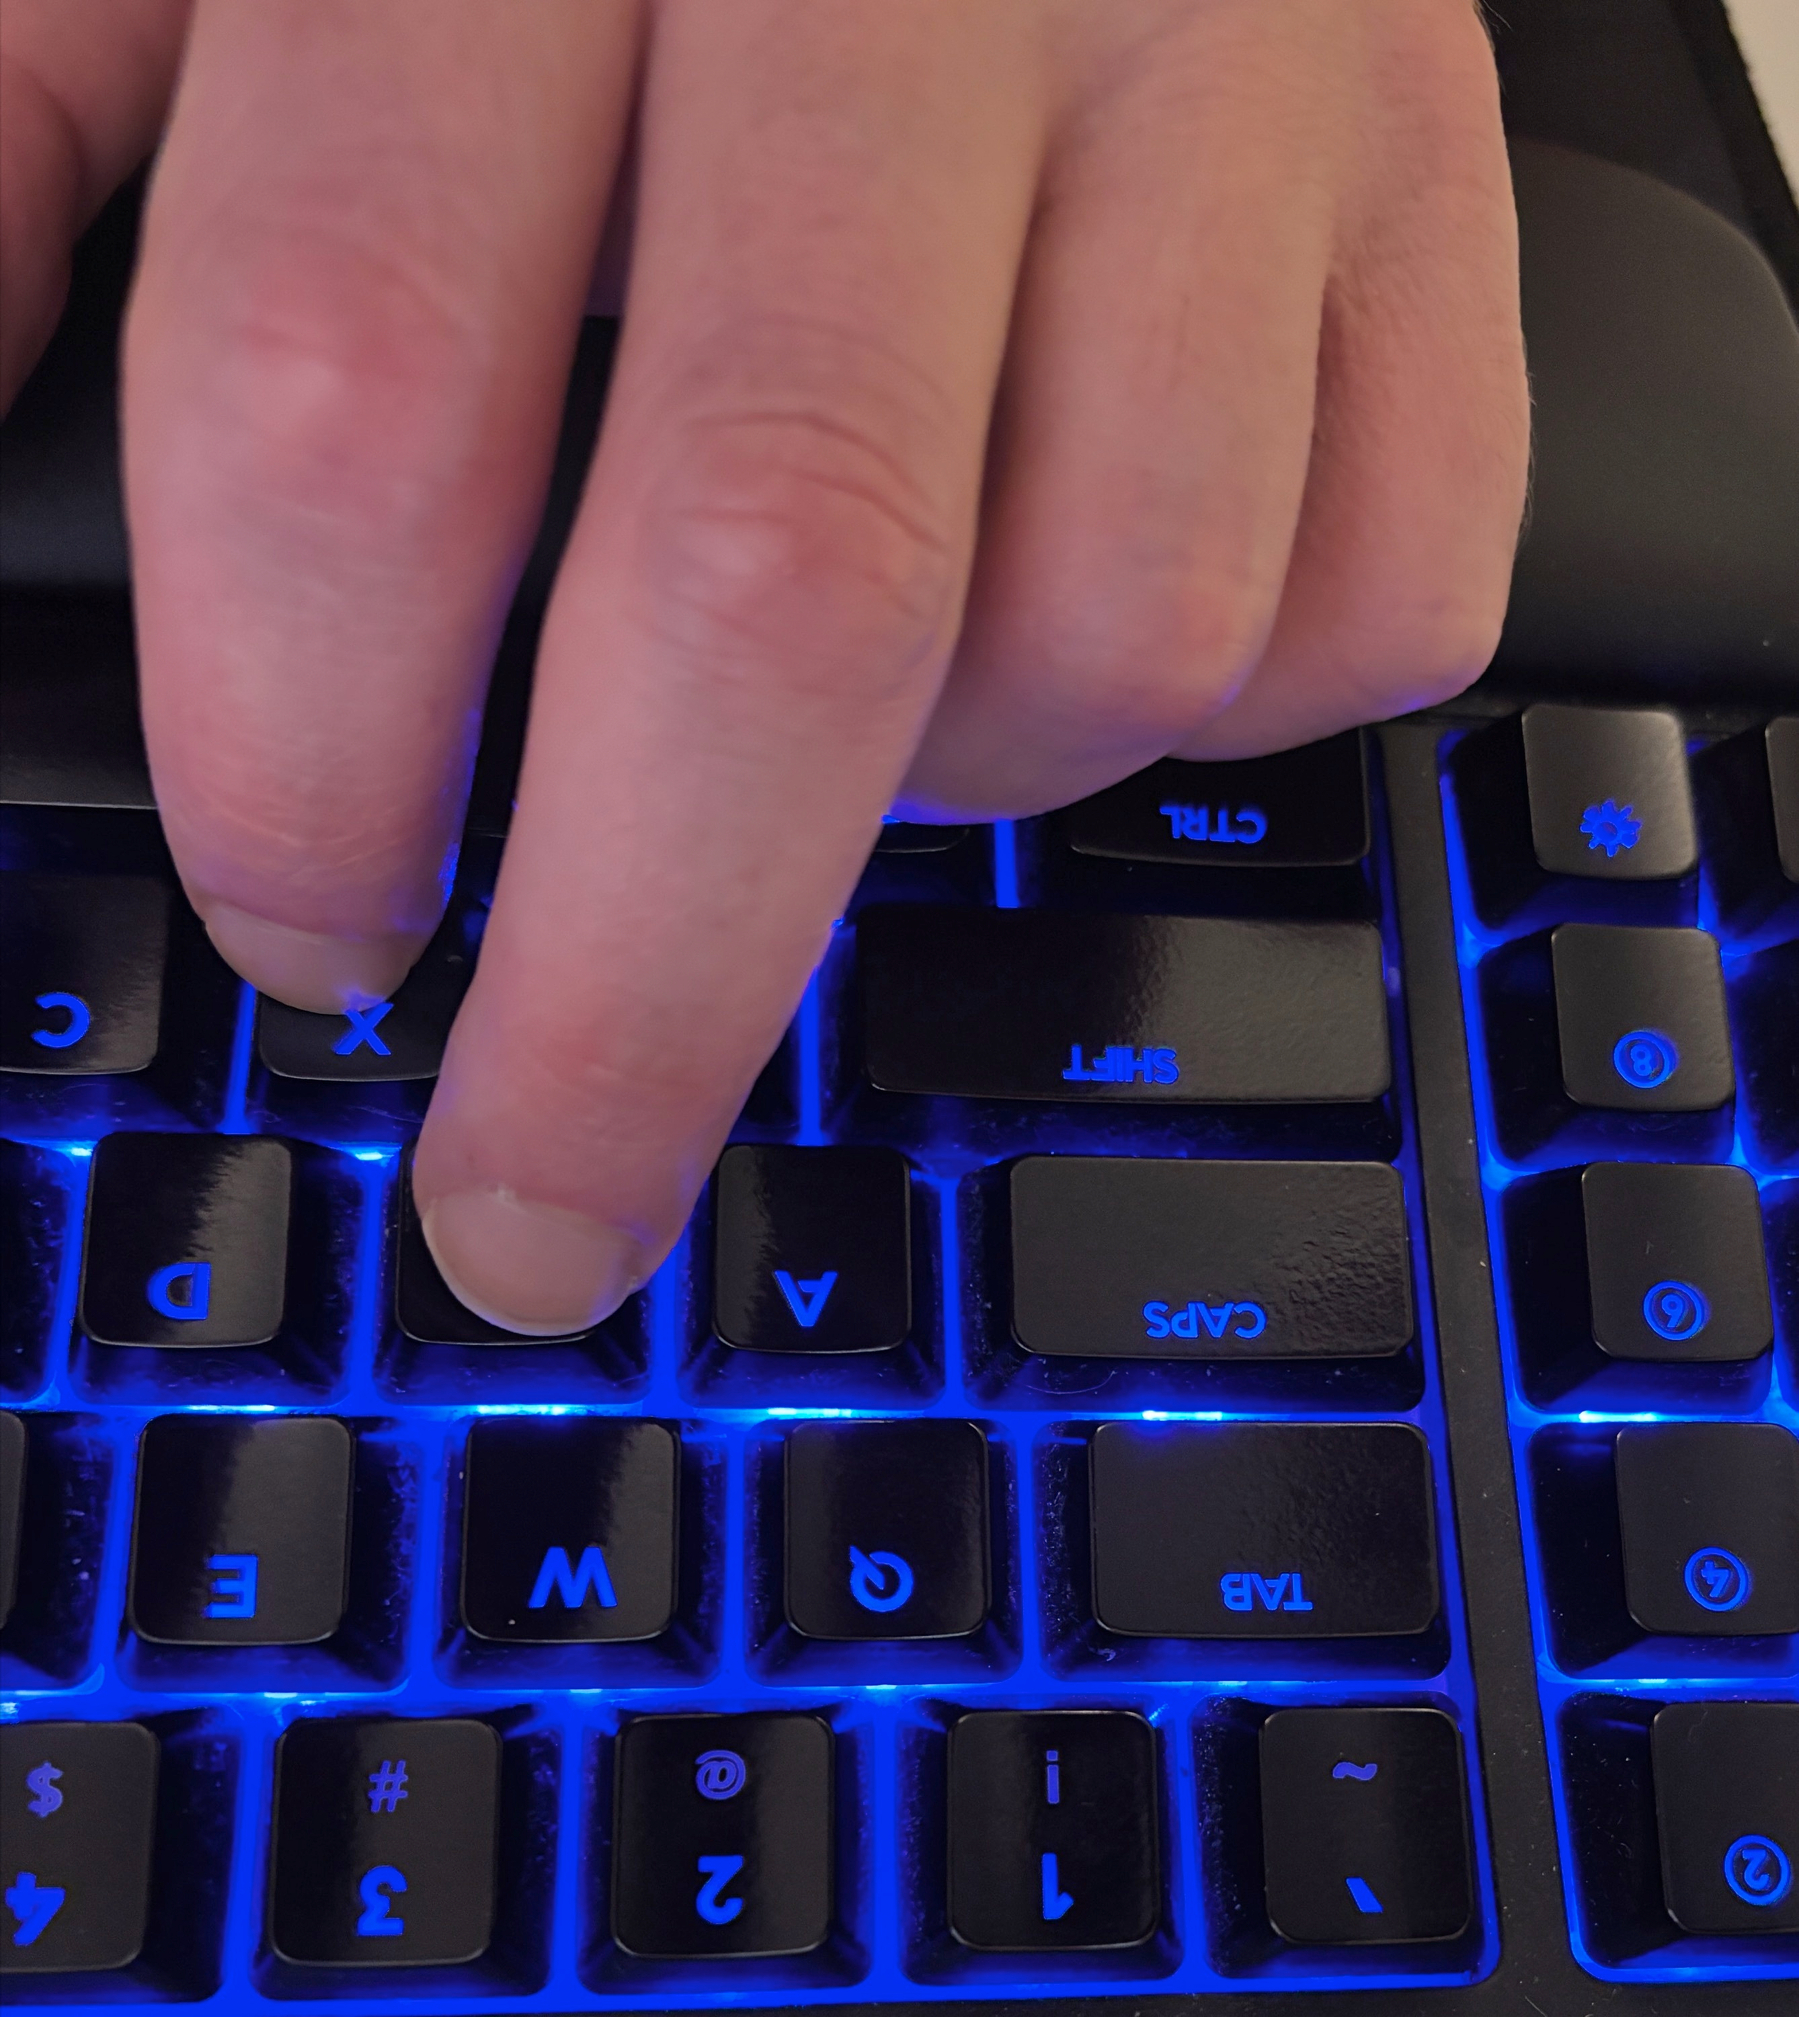
This adjustment is the easiest, since I know where these Control keys are by muscle memory. I turned off my Caps as control on my Mac to make sure I don’t get tempted to go back to my old habit. It’s been working OK, and that’s what I’m doing right now for writing this post.
Other Emacs users have suggested several things, and I’ve been considering and trying a few of them.
god-mode came up a couple of times. It creates a chord (two keys pressed at once) key binding that triggers a control press. For example, sd, and then xs (separately) to save a file in Emacs — same as C-xC-s. This can be useful, but it has two problems.
The obvious one is that this shortcut works only in Emacs. When I don’t use Emacs, which happens more often than I’d like for work, I have to use the OS shortcuts. Caps is so ingrained in my fingers’ memory that I just use it all the time, but now I need to start thinking of other options. I could probably program the keyboard’s firmware to do something similar, but that’s a topic in itself — and if I do that, I don’t need god-mode anyway. Another odd issue is that it doesn’t work on my Mac. It throws a GCC error, which from what I gather has to do with Emacs internals and how it works (or doesn’t work in this case) with its internal compiling mechanisms. Yes, I tried the fix, which doesn’t seem to work well with Homebrew, and I gave up on it.
There are other packages like god-mode, but I think the next one I’m going to try is Xah Fly Keys, because what he’s after seems to make sense to me. Which brings me to the next point: a new keyboard.
New Keyboards
I’ve been considering a new keyboard for a while, and the RSI has sped up the process. I’ve looked at a couple reviews and YouTube videos in the last couple of days. Kinesis, my current keyboard brand, is a known name in the ergonomic keyboard world, but after checking out their Advantage 360 I’m not sure I’m sold. It’s an excellent premium-looking keyboard, but it’s having a huge and heavy keyboard again. My hands are small, and I’m not sure I want to commit to another expensive giant, especially when I already struggle with room for the mouse, especially when the two halves are spread apart for the shoulders. I already compromise on this, and my chest is closer than it should be. I also think that for the price of these keyboards (over $400), I might want to take them with me when I go to the office, and with a Kinesis keyboard, this is not going to happen. Another thing I’m considering is going wireless, because of my USB switch setup. It can take my Linux Desktop or the Mac up to 30 seconds to detect the keyboard when I switch, which is small, but still annoying. The mouse, connected by a Bluetooth dongle, takes a second to switch over.
The above reasons, and Xah’s reviews, landed me on Glove80, which is even a weirder-looking keyboard. This keyboard takes ergonomics further (or just looks crazier, if you’re not into those). It’s wireless and lighter, which means taking it with me makes more sense, and will hopefully fix the USB lag issue. It has keywells for the fingers, which is basically a “dip” or a bowl (hence the name) that curves downwards so your fingers, which are naturally curled on a keyboard, are resting downwards. It has its own super-light switches, which, while I don’t think I need them, are another example of thinking of RSI and finger pain.
Going further with light keyboards, there’s the Voyager, which is tiny, lighter, and minimal. It’s not wireless, but it’s meant to be mobile, and it’s probably the best one for small hands. However, the Voyager only has 52 keys. It’s meant to be used with layers — meaning, there’s a modifier key that creates another “layer” of keys, which makes your Alt act as Ctrl, for example. I’m not sure I’m sold on this idea, especially when we’re talking Emacs. If I’m already challenged by my lack of Caps Lock, I can only imagine how much time I will have to sink into this keyboard with its layers and grid layout (which the Glove80 has too, by the way) to become efficient with it. I also think the Keywell is something I could use, so I have a rough idea of what I want to try next.
The problem with the Glove80 is that you can’t really try it out. They have a 30-day return policy, shipping not included, and they’re in New Zealand. A keyboard like that takes time to get used to, and 30 days for a $ 400-plus keyboard requires a level of confidence in the product I don’t have yet.
My conclusion so far
All in all, I think what I’m looking at is a combination of adjustments rather than one solution. I need to get used to the idea of different key bindings, be it something like god-mode or Xah Fly Keys, which will make it easier to use with a new keyboard and would also be beneficial now, until I get it. The idea of layering is a bit daunting, but I can see the wisdom in it, especially after I got an email back from BSAG, who was kind enough to share her experience with me (she’s the one who told me about the Voyager keyboard).
It will be a while before I buy a new keyboard, then it will take some time to get here, and then it will take me even longer to get used to one. I’m not looking forward to having my typing hindered even further, especially because I’m so dependent on writing notes all the time, but it’s also because of it that I have to do it. This is one thing I know I need to do.
Back to Solarized
Years ago, when I started the old blog1, I discovered Solarized.
I liked it. The colors were beautiful and worked for me, but eventually I switched to the Gotham theme in Emacs, which, if you take a look, is not much different — just a bit darker. I stayed with this theme for a long time, tweaking it a bit after a trip to New Mexico.
When I received my Mac and started working on it at home, I enjoyed its automatic switching between dark and light themes. At the same time, Prot started coming out with more of his excellent Ef Themes, and I adopted ef-reverie for my light theme and ef-night for my dark one (once again, if you look at the images, you’d see they’re not far off from Solarized, especially my choice of a light theme).
This has been the state of affairs until the beginning of this week, when I “found” Solarized again. I discovered Prot himself was heavily influenced by Solarized, and he discussed it several times on his blog. Here’s part of his background story for his project Prot16:
My starting point for developing a colour scheme was Ethan Schoonover’s Solarized. A true masterpiece. I thus settled on a method of using a 16-colour palette that consists of 8 base values and 8 accents. As with Solarized, the themes would have to be able to transition from ’light’ to ‘dark’ environments with minor alteration to the mapping of colours (though not the values themselves).
Prot’s quest is an interesting one. Like me, he enjoyed Solarized, but eventually decided the colors were not contrasting enough for his taste. His reaction was to create his well-known Modus themes, which, along with his Ef-themes and Prot16, set new theming standards for Emacs.
Meanwhile, I have had the other issue since childhood:
I’ve never liked harsh contrast for this reason. As a matter of fact, a more “gentle” contrasting theme is one of the reasons I like working in Emacs. My website and my wiki are a result of these preferences. The black text on the beige background is comfortable on my eyes. Enough contrast to read, but not enough to burn text into my vision, as many dark modes out there do.
While Prot’s ef-themes offer softer contrast (I didn’t check, but it does seem so visually) which I find excellent, I decided to try out bbatsov’s Solarized for Emacs, which I didn’t know about in the past when I first picked up this theme for Emacs — the official Emacs port is not as good in my opinion.
I’ve learned a couple of things I wasn’t aware of. For starters, you can have many variations of this theme, even though the main 16 colors are still preserved. It makes sense when you think about it: one person can choose Solarized’s red (#dc322f in hex) as an emphasis, while another can select its yellow (#b58900) or orange (#cb4b16), for example. Webpages and Emacs take it a step further, as certain texts can be bold or italicized, with solid underlines or dashed ones, etc. All of those changes take place without touching the colors themselves.
Solarized also helps me with a certain itch I’ve had for a couple of months: a dark theme for my blog. I know most of you read my posts in your RSS reader, hopefully with a theme you enjoy, so this won’t matter much. For me, how my site looks and is styled is important, and getting there is fun.